Today, we’re announcing Shipyard’s newest series: GitHub Action Recipes. In each post, we’ll show you a sample action (or two) that you can add to your GitHub Actions workflows. Let us know what you think – what would you like us to cover next? Reach out at hello@shipyard.build to share your ideas.
TLDR: This GitHub Actions workflow builds a Docker image, tags it, and pushes it to one of three container registries. Here’s a Gist with the boilerplate code.
Building Docker Images and Pushing to a Container Registry
Time: 7 Minutes Difficulty: Beginner
If you haven’t yet integrated GitHub Actions with your private container registry, this tutorial is a good place to start. The resulting workflow will log in to your private registry using provided credentials, build existing Docker images by path, and push the resulting images to a container registry. We’ll discuss how to do this for GHCR, Docker Hub, and Harbor.
Benefits and Use Cases
Building and pushing Docker images using your CI/CD platform is a best practice. Here’s how it can improve your developer QoL:
- Shared builds: streamline the process, configuration, and dependencies across all builds for easy reproducibility
- Saves build minutes: team members can access existing images instead of rebuilding from source
- Version control: easily duplicate previous builds with image tags, allowing teams to trace and pinpoint bugs
Building a Docker Image
Using GitHub Actions to automate Docker builds will ensure you keep your build config consistent. This only requires substituting your existing build command(s) into the workflow YAML. In this workflow, the image is named after your GitHub repo using the GITHUB_REPOSITORY environment variable as {{ github.repository }}.
name: Build Docker image
on:
  push:
    branches:
      - main

jobs:
  build:
    runs-on: ubuntu-latest

    steps:
      - name: Checkout code
        uses: actions/checkout@v4

      - name: Build and tag image
        COMMIT_SHA=$(echo $GITHUB_SHA | cut -c1-7)
        run: docker build -t ${{ github.repository }}:$COMMIT_SHA -f path/to/Dockerfile .
Versioning Your Docker Image Tags
Never rely on latest tags to version your images. We recommend choosing one of these two versioning conventions when tagging your images: using the GitHub commit hash or following the SemVer spec.
Using the GitHub Hash
GitHub Actions sets default environment variables that you can access within your workflow. Among these is GITHUB_SHA, which is the commit hash that triggered the workflow. This is a valuable versioning approach because you can trace each image back to its corresponding commit. In general, this convention uses the hash’s first seven digits. Here’s how we can access the variable and extract these digits:
- name: Build and tag image
  run: |
    COMMIT_SHA=$(echo $GITHUB_SHA | cut -c1-7)
    docker build -t ${{ github.repository }}:$COMMIT_SHA -f path/to/Dockerfile .
Semantic Versioning
When using version numbers, it is best practice to follow the SemVer spec. This way, you can increment your version numbers following a consistent structure when releasing new updates and patches. Assuming you store your app’s version in a root file version.txt, you can extract the version number from this file and tag the image in two separate actions:
- name: Get version
  run: |
    export VERSION=$(cat version.txt)
    echo "Version: $VERSION"

- name: Build and tag image
  run: docker build -t ${{ github.repository }}:$VERSION -f path/to/Dockerfile .
Pushing a Docker Image to a Container Registry
You can easily build, tag, and push your Docker image to your private container registry of choice within only two or three actions. Here’s a high-level overview of what you’ll be doing:
- Manually set your authentication token or access credential(s) as repository secrets
- Use the
echocommand to pipe credentials to standard input for registry authentication. This way, no action is required on the user’s part. - Populate the workflow with your custom
buildcommand. Remember to follow your registry’s tagging convention. - Add the
pushcommand. You can find the proper syntax in your registry’s docs.
You may prefer to split each item into its own action for better traceability on a workflow failure.
Pushing to GHCR
Step 1: Setting up GHCR credentials
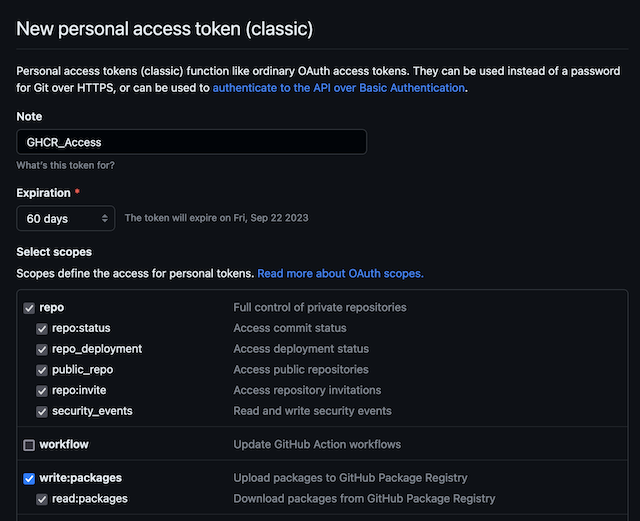
In order to access the GitHub API, you’ll want to generate a personal access token. You can do this by going to Settings → Developer → New personal access token (classic) from where you’ll generate a custom token to allow package access. Make sure to select write:packages in the Select scopes section.

Store this token as a repository secret called GHCR_TOKEN.
Step 2: Action Recipe To Push To GHCR
You can add the following actions to your GitHub Actions workflow. This code will log into GHCR, build, and push your Docker image.
- name: Log in to ghcr.io
  run: echo "${{ secrets.GHCR_TOKEN }}" | docker login ghcr.io -u ${{ github.actor }} --password-stdin

- name: Build and tag image
  run: |
    COMMIT_SHA=$(echo $GITHUB_SHA | cut -c1-7)
    docker build -t ghcr.io/${{ github.repository_owner }}/${{ github.repository }}:$COMMIT_SHA -f path/to/Dockerfile .

- name: Push image to GHCR
  run: docker push ghcr.io/${{ github.repository_owner }}/${{ github.repository }}:$COMMIT_SHA
Pushing to Docker Hub
Step 1: Store your Docker Hub credentials
Using your Docker Hub login credentials, set the following repository secrets:
DOCKERHUB_USERNAMEDOCKERHUB_PASSWORD
Note: You’ll need to set up a repo on Docker Hub before you can push your image.
Step 2: Action Recipe to Push to Docker Hub
Adding these actions to your workflow will automate logging in to Docker Hub, building and tagging an image, and pushing it.
- name: Log in to Docker Hub
  run: |
    echo ${{ secrets.DOCKERHUB_PASSWORD }} | docker login -u ${{ secrets.DOCKERHUB_USERNAME }} --password-stdin

- name: Build and tag image
  run: |
    COMMIT_SHA=$(echo $GITHUB_SHA | cut -c1-7)
    docker build -t ${{ secrets.DOCKERHUB_USERNAME }}/${{ github.repository }}:$COMMIT_SHA -f path/to/Dockerfile .

- name: Push image to Docker Hub
  run: docker push ${{ secrets.DOCKERHUB_USERNAME }}/${{ github.repository }}:$COMMIT_SHA
Pushing to Harbor
Step 1: Store your Harbor Access Credentials
Create two new repository secrets to store the following info:
HARBOR_CREDENTIALS: your Harbor username and password formatted as username:passwordHARBOR_REGISTRY_URL: the URL corresponding to your personal Harbor registry
Note: You’ll need to create a Harbor project before you can push an image to Harbor.
Step 2: Action Recipe to Push to Harbor
The actions below will authenticate into Harbor, build and tag an image using Harbor-specific conventions, and push the image.
- name: Log in to Harbor
  run: |
    echo ${{ secrets.HARBOR_CREDENTIALS }} | base64 --decode | docker login -u $(cut -d ':' -f1 <<< "${{ secrets.HARBOR_CREDENTIALS }}") --password-stdin ${{ secrets.HARBOR_REGISTRY_URL }}

- name: Build and tag image
  run: |
    COMMIT_SHA=$(echo $GITHUB_SHA | cut -c1-7)
    docker build -t ${{ secrets.HARBOR_REGISTRY_URL }}/project-name/${{ github.repository }}:$COMMIT_SHA -f path/to/Dockerfile .

- name: Push image to Harbor
  run: docker push ${{ secrets.HARBOR_REGISTRY_URL }}/project-name/${{ github.repository }}:$COMMIT_SHA
Thanks for reading!
We hope you enjoyed today’s featured recipes. We’re looking forward to sharing more easy ways you can automate repetitive tasks and chores with GitHub Actions.
If you’d like to add Shipyard to your GitHub Actions workflow, check out our docs.


